
Thursday, September 22, 2011
My railway is visible from space!
My railway joins the Great Wall of China and the Pyramids as one of the few human constructions visible form space! 
Saturday, June 4, 2011
Older videos during track construction
Now that I've figured out how to add videos I've posted two more from last fall and early this spring during construction of the railway. Nice to see the progress in the line and the flora.
Tuesday, May 31, 2011
Finshed!


Tuesday, May 24, 2011
Almost finished!


The bridge a few weeks ago and now. Pretty impressive what a few weeks of good weather will do to the greenery. I have already had to cut back the plants on the other side of the pond as the railway was impassable.

Friday, April 29, 2011
Making ties and big bridge completed
My last day to work on the track started out rainy so I finished up some more ties. I use a self made tie jig to predrill the holes for the screws at just the right distance apart.


The jig is just a short piece of angled aluminum bought at the local big box store. It was cut to size and then I screwed on an old tie with just enough space for a tie to fit snuggly in it. The holes were drilled with just the right spacing so when the rail is slipped through the screws it is in the proper guage.

Screws were then screwed into the predrilled holes. Now I can slide the tie on the rails, space them right and then hand tighten them down. I bought a tool from Real Trains to put on the ties and keep them at the exact gauage when I tighten the screws down in the field.


The weather cleared enough for me to lay out the last 8 feet of the bridge/trestle. I laid the cedar 2x4's on top so it had a look of a curve instead of three straight sections. Now just the last 3 feet or so of fill needed at the other end and then I can lay the rail and connect the line.
Friday, April 22, 2011
Making the big bridge


I dug the first two post holes and drilled out 4x4 posts then bolted on the 2x8's. Put them in the ground to see where to dig the next set of holes. I made it bridge have a 1% grade to avoid having to have too much of a grade to reach the low spot of the little bridge.


Since this end will need to accomodate joists from both sides, and since there will be an angle between them (this is a curved bridge) I'm using 2x6 cross beams to rest the ends of the beams on. These are screwed to the 2x4's and 2x6's and a metal strap will connect each 2x8 to the next one.


Thursday, March 31, 2011
Adjusting the line
 |
| So after riding on the line with the new engine I can spot a bunch of mistakes, this turn in particular was too sharp and many of the gaps between the rails were too big. This was causing frequent derailments. I decided to desharpen the curve so moved over the brick edge (luckily I had just set them on the ground and they weren't cemented down.) Then I disconnected one end of the rail, loosened up the ties and made the curve more gentle. I had to cute off about 8 inches of rail on both sides and redrill holes for the rail joiners, the drilling jig from Real Trains made this very simple to do in the field. At the same time I closed down the gaps in between the rails. |
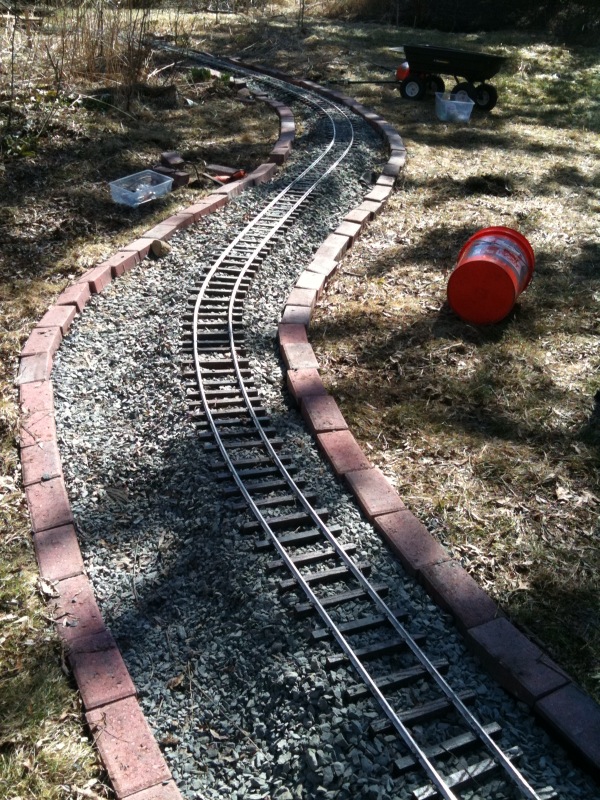 |
| Here is the corrected and reballasted curve. The train runs much better on it. I've built up the ballast some but the gradient is still too much. I'm going to raise the line at least another 6 inches with more ballast, just a few more dozen trips to the stone yard with the minivan. When all is right I'll move the other brick line over to keep it even looking. Proper planning would have avoided the need for this adjustment so learn from my mistakes. Now I can ride the full 170 feet of track that is down. So the next step is to finish the last 50 feet of line before I get to the last 30 feet the will require alot of fill and a larger bridge. |
Thursday, March 24, 2011
First ride under motive power!

After getting the engine going there was essentially no further progress on extending the line, just fixing what I've got down so far.
Here's a you tube link to the first drive:
http://www.youtube.com/watch?v=_EgwvLGIfoI
Spring returns and work resumes, now with an engine!
 |
| We have our first few days into the 50'sF, so back to work. We're heading towards the first small bridge. |
 |
| Child labor laws are no obstacle on this railway as my railway gang removes ties from an old panel so they can be reused. The rail needs to be bent for these curves so the ties must be removed first. |
 |
| We make it to the first bridge going over a small stream. About 150 ft of rail down now, 80 to go. |
 |
| Motive Power! I've got a Maxitrak chasis kit from the UK put together and upgraded the motor controller to the 4QD VTX with hand controller. |
 |
| Attached it to my home made flat car. Trucks (the wheels and axels) are from One Inch Scale Railroad Supply. |
 |
| Coupler is a home made one with spare parts from the local big box store conecting to the Maxitrak chasis connector. |
Friday, February 18, 2011
Work Recommences
 |
| January is not the best month for outdoor railroading in Wisconsin. |
 |
| I waited for this to improve... |
 |
| Getting above freezing for a few days in February, start to see the track again. |
 |
| I was able to predrill the rest of the plastic lumbar ties and place them under the rail I laid out in the Fall. |
  |
Subscribe to:
Posts (Atom)